Thursday, 16 February 2012

Candle Lite Card

Today, I have a very special card to share and I love it's cuteness because of it's shape and size.  But what is even more important is the feel of the card . . 

The receiver pulls the tag to light the candle and it says "Thank You!" On the inside I have written message "You enlightened my world" so.. apt to thank somebody.     


How I made this.. took a plastic sheet, twine, a flower and cut some paper pieces to make the candle shape and flame.
Taped the twine in between two flame pieces.
Glued them together..
This portion is similar to the double slider card technique much simpler because it slides to one side only.  Taped the plastic sheet, one side on the flame and the other on the back of the candle.
Added card pieces on three sides to secure the flame movement.
This is how the candle looks..
I have decorated the candle with a poinsettia flower which would make it appropriate for Christmas and as it is a candle it could be made for Diwali.  So ..

Thank you! 
You enlightened my world.


Tuesday, 14 February 2012

Cake Card

Last time I had made the heart bouquet card and that was much appreciated So, with the encouragement I could come up with another card idea.  I actually have so many ideas popping in  my head but I could do it because of you guys.  Here's the card that I have made and it's a three layer Cake Card .. 


First, I cut 3 circles - one each of big, medium and small sizes.  I draw these circles using crockery plates so it was much easier and I got perfect and desired sizes of the circles.  All three circles are of the same color.


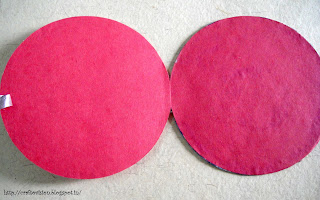
For the inside of the card I have cut two medium size circles but of different color paper.. a little darker shade of pink to show the effect and difference when it's open.  These two circle should be combined as in the image below.  To ensure that these circles stay join together, I folded a page in half and then draw and cut the circle shapes together.  I also added tape at the back of the joint to doubly sure that these wouldn't tear apart even after opening and closing several times.  I then added this piece to the medium size card (of lite pink color).  Adding a ribbon on the side of it will help open the card easily and this completes the middle layer of the card.

To give depth to the layers of the cake I have pasted cardboard circles in between each layer.  An alternative and easier way to do that would be adding double sided foam tape. 

Finally, put all the layer together.  As the card itself looks super duper yummy I didn't do much to decorate it. This is how the card looks with it's open.. 


 Another view of the card ..

Do post your comments to let me know if you liked the idea behind this card.  

Friday, 10 February 2012

Love Express - Toy Train

I'm Super-excited to share my latest craft project and it's a Toy Train - Love Express! 

Basically I used some boxes as the bogies and bottom of the engine.  Engine's circular shape is custom cut (Cello tape cardboard, shuttlecock box or  chips box can also be used).  Train Tiers are made of black paper cut into flower shape, two mirrors added as the headlights.

I used a fabric flower to make the smoke of the chimney and chimney is made of toilet paper roll.

Two cute passengers riding the train.. I had other plans to keep my perfume bottles in this place but not until I'm done with the overdose of cuteness of these soft toys.

This is the Goods Wagon and it's carrying Flower pots.  I have used egg cartons to make the flower pots then stuffed them with some sponge and decorated with flowers on top.

For the Caboose I simply made a sign that says "Bon Voyage".  The green plastic design came off of a brush   used for washing clothes and pink thread that's joining the train parts is from the rice packaging. 

Love Express is on it's way to spread Love this Valentine, Bon Voyage!

Friday, 3 February 2012

Violet Card

My current favorite colors is Violet. I have made this card for some challenges.


The challenge image below has all my favorite stuff.. laces, flowers, chandelier, bird, candles and most important ..the feel of love.  What inspired me the most was various shades of a color combined with white Wow! The pearl lace is not photogenic ;) looks really pretty in person.

I have used a template to cut the black chandelier type shape, the love bird silhouette I have drawn myself, colored with white pearl paint, fussy cut and then backed with purple paper.

Hope you like it.

1. ICRC15: Feel the Love + Photo Inspiration

2. Beyond Grey:  make a non traditional "love card or project" with" NO hearts , NO red or pink color"
3. Pretty paper Studio: Make a scrapbook page or a card with the word 'YOU' in it
4. Crafty JC: Valentine with Non-traditional colors

Heart Bouquet Card

This is a trick card, I made a bouquet of flowers but when opened ..


It becomes a heart..    Well this is how to make hubby to say 'Yes' for every!  tricks are woman's best friends ;)  


Related Posts Plugin for WordPress, Blogger...